Deploy Windows 10 Enterprise Licenses
Active Directory synchronization with Azure AD
You probably have on-premises Active Directory Domain Services (AD DS) domains. Users will use their domain-based credentials to sign in to the AD DS domain. Before you start deploying Windows 10 Enterprise E3 or E5 licenses to users, you need to synchronize the identities in the on-premises ADDS domain with Azure AD.
You might ask why you need to synchronize these identities. The answer is so that users will have a single identity that they can use to access their on-premises apps and cloud services that use Azure AD (such as Windows 10 Enterprise E3 or E5). This means that users can use their existing credentials to sign in to Azure AD and access the cloud services that you provide and manage for them.
Figure 1 illustrates the integration between the on-premises AD DS domain with Azure AD. Microsoft Azure Active Directory Connect (Azure AD Connect) is responsible for synchronization of identities between the on-premises AD DS domain and Azure AD. Azure AD Connect is a service that you can install on-premises or in a virtual machine in Azure.

Figure 1. On-premises AD DS integrated with Azure AD
For more information about integrating on-premises AD DS domains with Azure AD, see the following resources:
- Integrating your on-premises identities with Azure Active Directory
- Azure AD + Domain Join + Windows 10
Note
If you are implementing Azure AD, and you already have an on-premises domain, you don't need to integrate with Azure AD, since your main authentication method is your internal AD. If you want to manage all your infrastructure in the cloud, you can safely configure your domain controller remotely to integrate your computers with Azure AD, but you won't be able to apply fine controls using GPO. Azure AD is best suited for the global administration of devices when you don't have any on-premises servers.
Preparing for deployment: reviewing requirements
Devices must be running Windows 10 Pro, version 1703, and be Azure Active Directory joined, or hybrid domain joined with Azure AD Connect. Customers who are federated with Azure Active Directory are also eligible. For more information, see Review requirements on devices, later in this topic.
Assigning licenses to users
Upon acquisition of Windows 10 subscription has been completed (Windows 10 Business, E3 or E5), customers will receive an email that will provide guidance on how to use Windows as an online service:

The following methods are available to assign licenses:
-
When you have the required Azure AD subscription, group-based licensing is the preferred method to assign Enterprise E3 or E5 licenses to users.
-
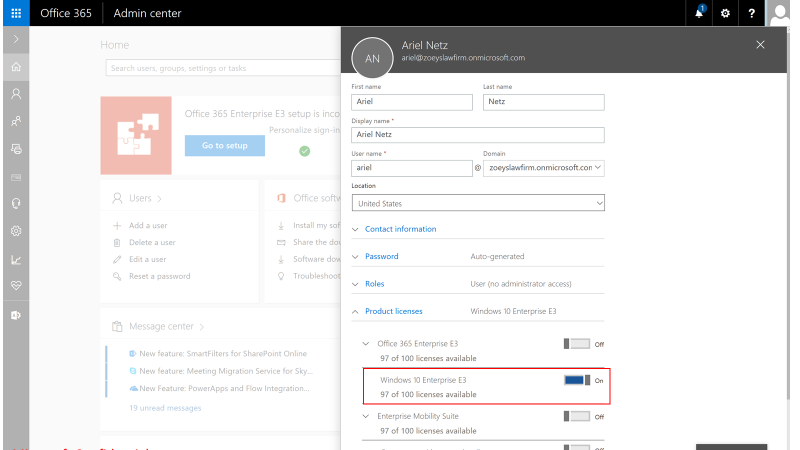
You can sign in to portal.office.com and manually assign licenses:
-
You can assign licenses by uploading a spreadsheet.
-
A per-user PowerShell scripted method of assigning licenses is available.
-
Organizations can use synchronized AD groups to automatically assign licenses.
Explore the upgrade experience
Now that your subscription has been established and Windows 10 Enterprise E3 or E5 licenses have been assigned to users, the users are ready to upgrade their devices running Windows 10 Pro, (version 1703 or later) to Windows 10 Enterprise. What will the users experience? How will they upgrade their devices?
Step 1: Join Windows 10 Pro devices to Azure AD
Users can join a Windows 10 Pro device to Azure AD the first time they start the device (during setup), or they can join a device that they already use running Windows 10 Pro, version 1703.
To join a device to Azure AD the first time the device is started
-
During the initial setup, on the Who owns this PC? page, select My organization, and then click Next, as illustrated in Figure 2.
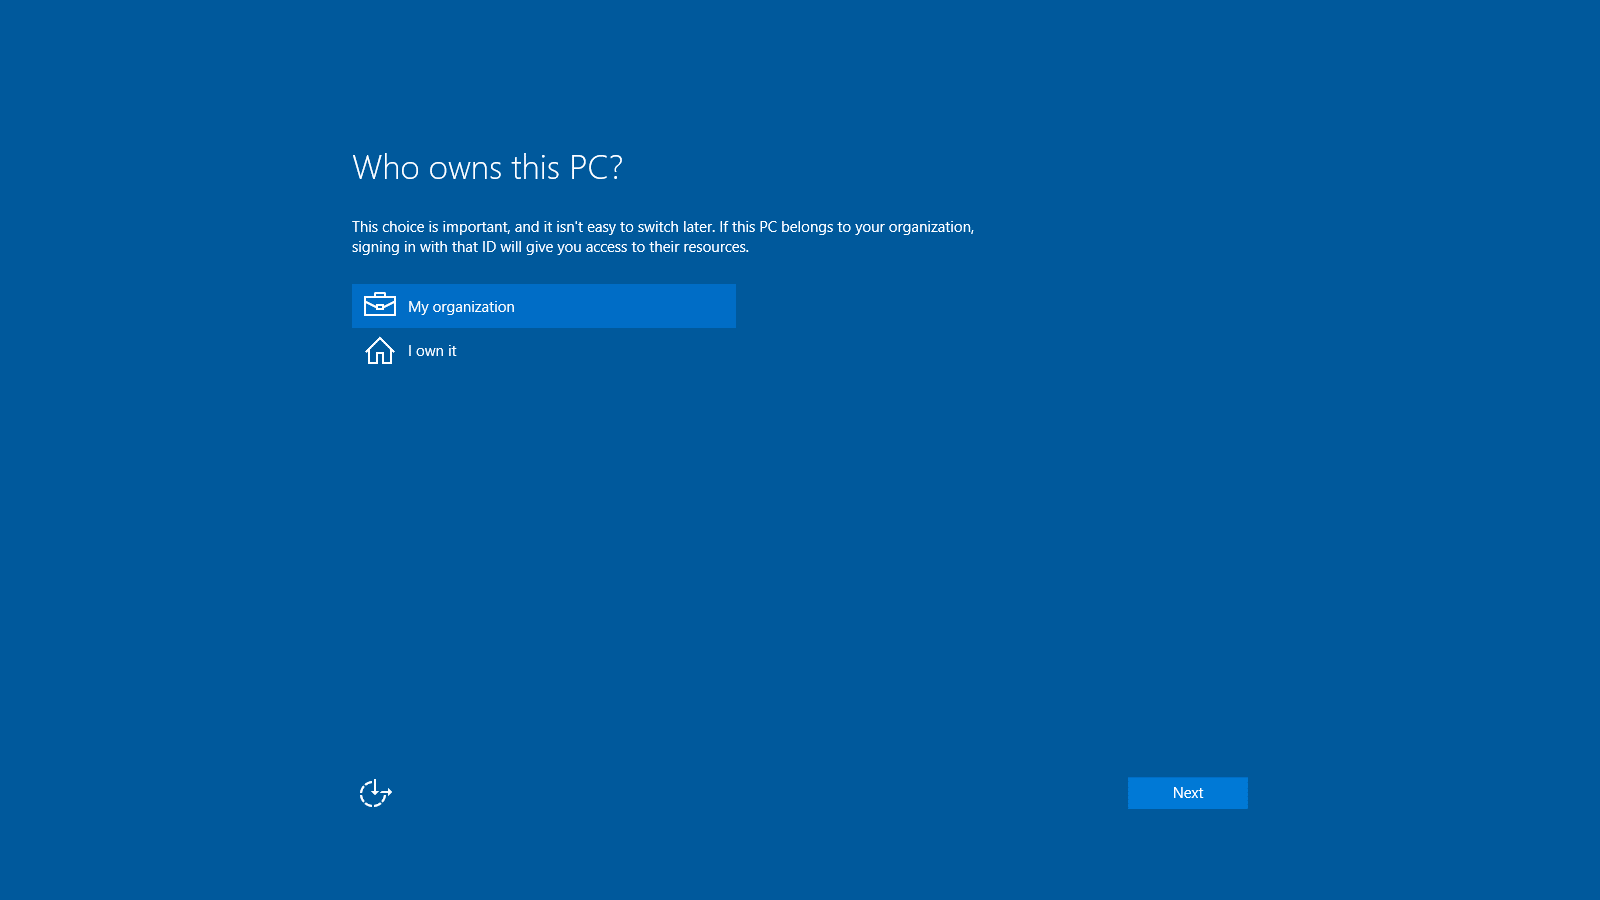
Figure 2. The “Who owns this PC?” page in initial Windows 10 setup
-
On the Choose how you’ll connect page, select Join Azure AD, and then click Next, as illustrated in Figure 3.
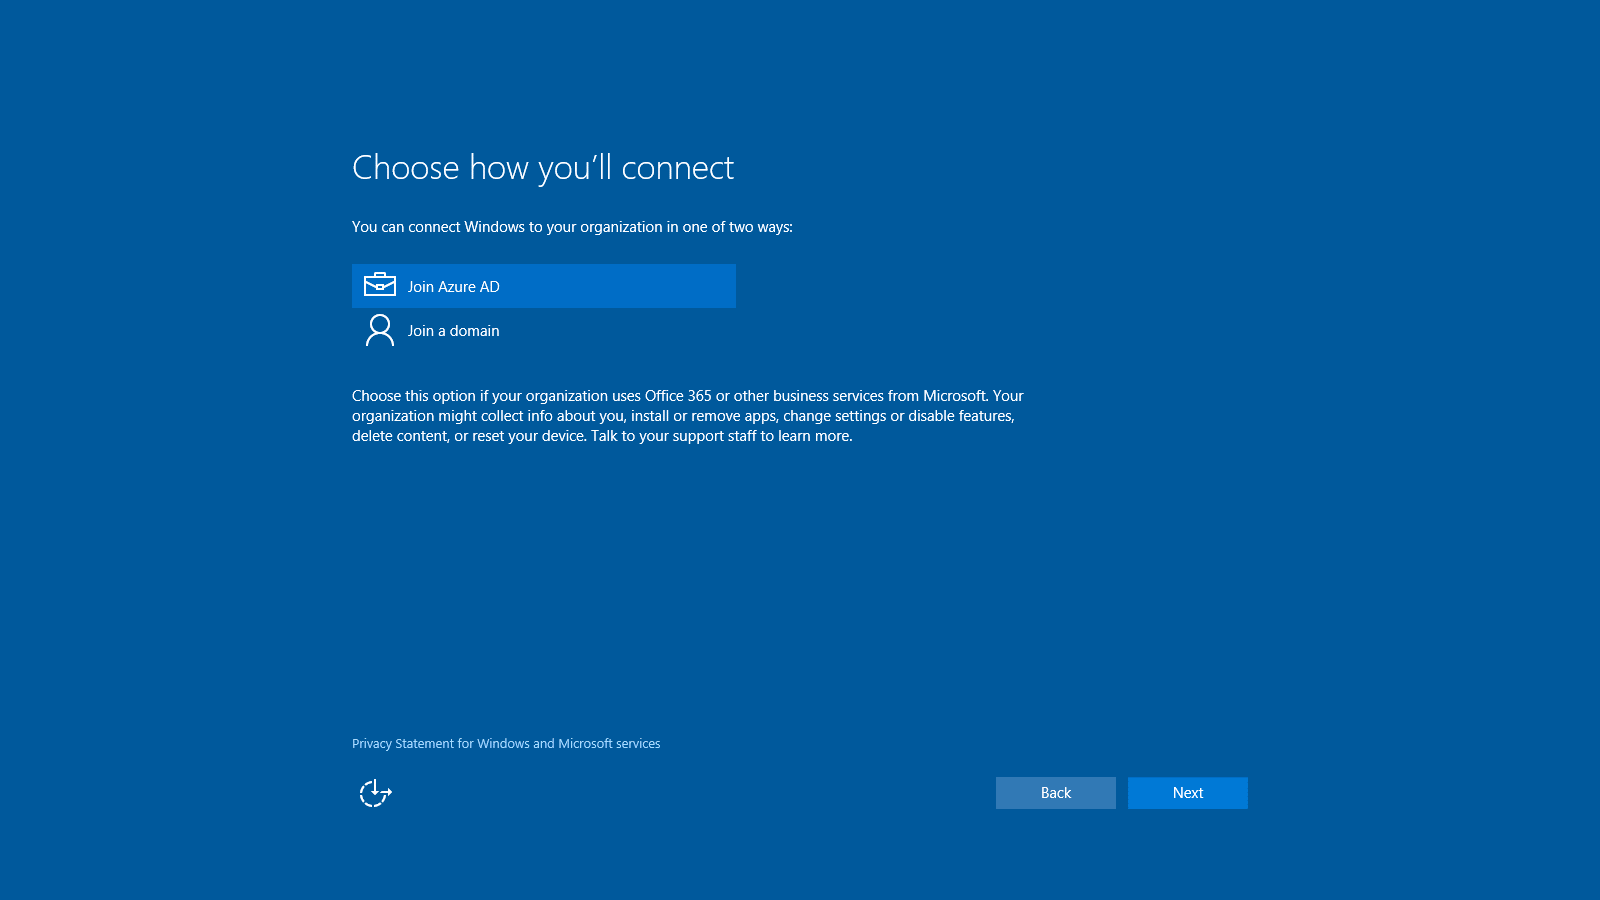
Figure 3. The “Choose how you’ll connect” page in initial Windows 10 setup
-
On the Let’s get you signed in page, enter the Azure AD credentials, and then click Sign in, as illustrated in Figure 4.
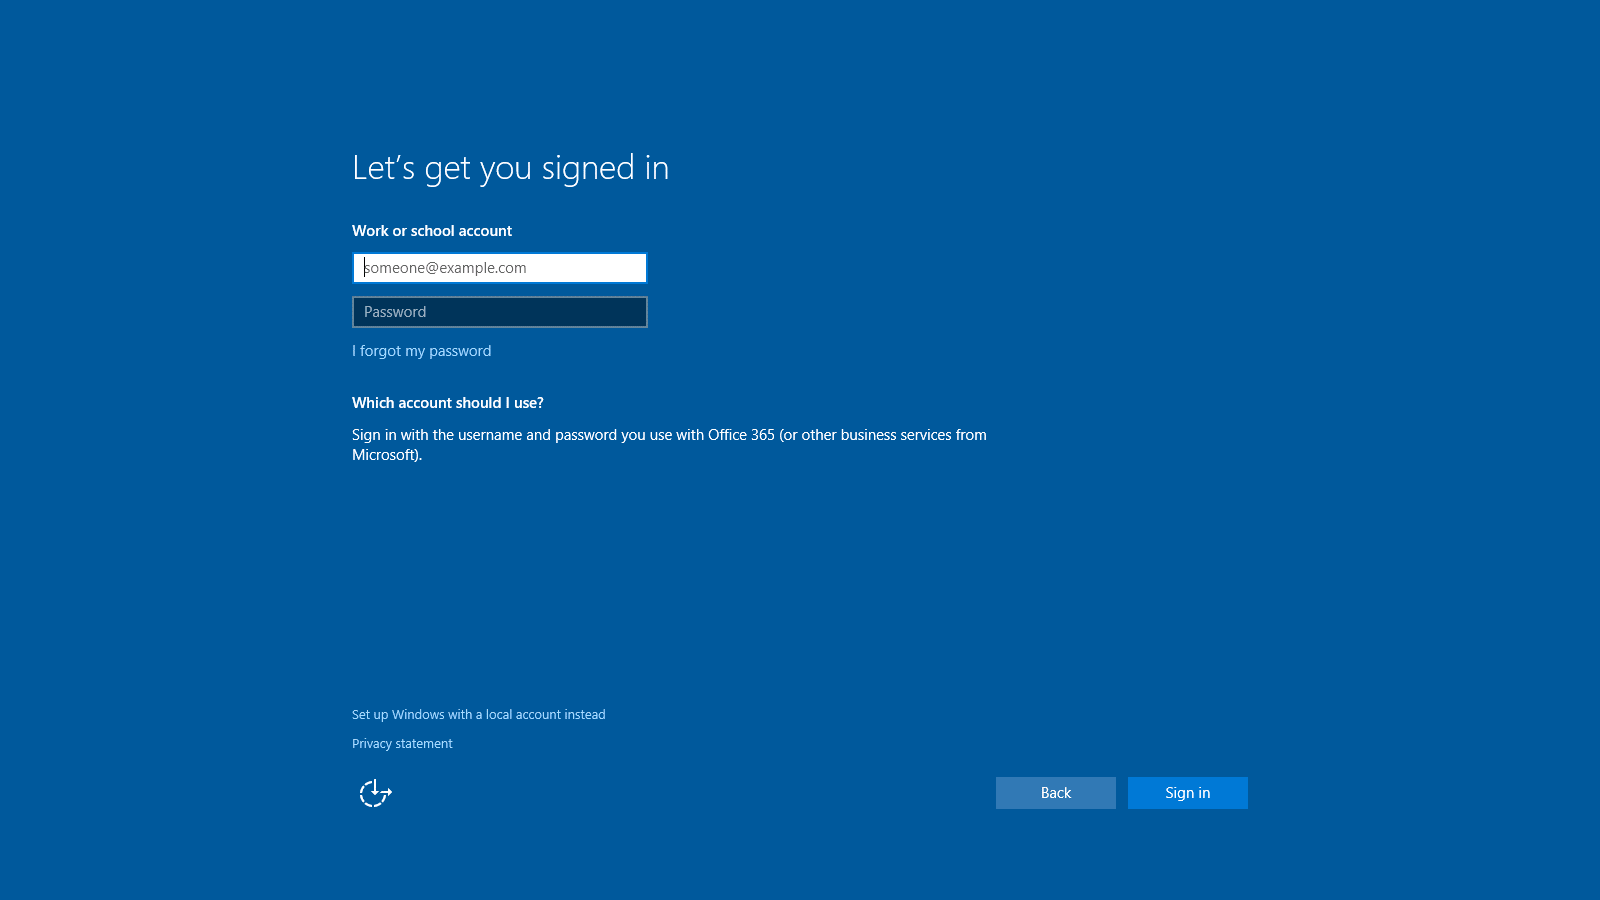
Figure 4. The “Let’s get you signed in” page in initial Windows 10 setup
Now the device is Azure AD–joined to the company’s subscription.
To join a device to Azure AD when the device already has Windows 10 Pro, version 1703 installed and set up
Important
Make sure that the user you're signing in with is not a BUILTIN/Administrator. That user cannot use the + Connect button to join a work or school account.
-
Go to Settings > Accounts > Access work or school, as illustrated in Figure 5.
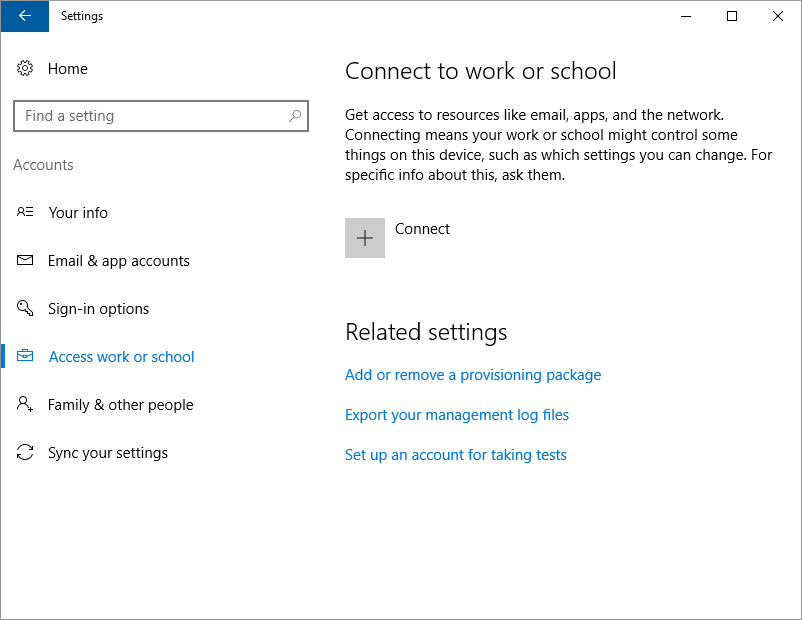
Figure 5. Connect to work or school configuration in Settings
-
In Set up a work or school account, click Join this device to Azure Active Directory, as illustrated in Figure 6.

Figure 6. Set up a work or school account
-
On the Let’s get you signed in page, enter the Azure AD credentials, and then click Sign in, as illustrated in Figure 7.
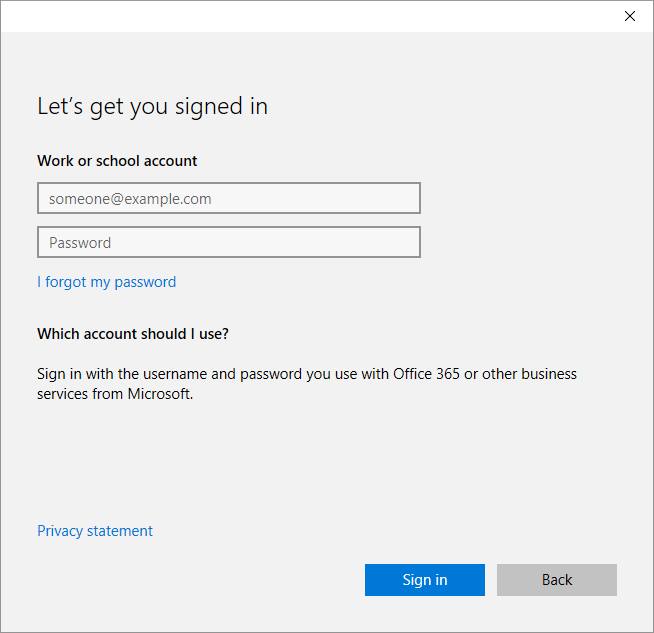
Figure 7. The “Let’s get you signed in” dialog box
Now the device is Azure AD–joined to the company's subscription.
Step 2: Pro edition activation
Important
If your device is running Windows 10, version 1803 or later, this step is not needed. From Windows 10, version 1803, the device will automatically activate Windows 10 Enterprise using the firmware-embedded activation key. If the device is running Windows 10, version 1703 or 1709, then Windows 10 Pro must be successfully activated in Settings > Update & Security > Activation, as illustrated in Figure 7a.

Figure 7a - Windows 10 Pro activation in Settings
Windows 10 Pro activation is required before Enterprise E3 or E5 can be enabled (Windows 10, versions 1703 and 1709 only).
Step 3: Sign in using Azure AD account
Once the device is joined to your Azure AD subscription, the user will sign in by using his or her Azure AD account, as illustrated in Figure 8. The Windows 10 Enterprise E3 or E5 license associated with the user will enable Windows 10 Enterprise edition capabilities on the device.

Figure 8. Sign in by using Azure AD account
Step 4: Verify that Enterprise edition is enabled
You can verify the Windows 10 Enterprise E3 or E5 subscription in Settings > Update & Security > Activation, as illustrated in Figure 9.
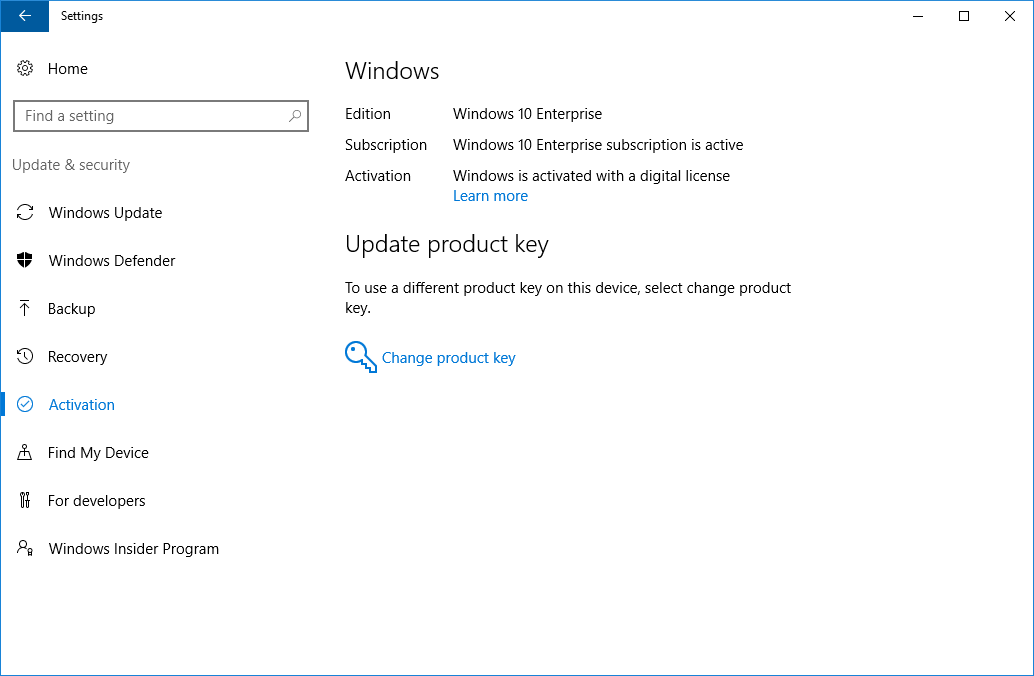
Figure 9 - Windows 10 Enterprise subscription in Settings
If there are any problems with the Windows 10 Enterprise E3 or E5 license or the activation of the license, the Activation panel will display the appropriate error message or status. You can use this information to help you diagnose the licensing and activation process.
Note
If you use slmgr /dli or /dlv commands to retrieve the activation information for the Windows 10 E3 or E5 license, the license information displayed will be the following: Name: Windows(R), Professional edition Description: Windows(R) Operating System, RETAIL channel Partial Product Key: 3V66T
Virtual Desktop Access (VDA)
Subscriptions to Windows 10 Enterprise are also available for virtualized clients. Windows 10 Enterprise E3 and E5 are available for Virtual Desktop Access (VDA) in Windows Azure or in another qualified multitenant hoster.
Virtual machines (VMs) must be configured to enable Windows 10 Enterprise subscriptions for VDA. Active Directory-joined and Azure Active Directory-joined clients are supported. See Enable VDA for Enterprise Subscription Activation.
Troubleshoot the user experience
In some instances, users may experience problems with the Windows 10 Enterprise E3 or E5 subscription. The most common problems that users may experience are as follows:
-
The existing Windows 10 Pro, version 1703 or 1709 operating system is not activated. This problem does not apply to Windows 10, version 1803 or later.
-
The Windows 10 Enterprise E3 or E5 subscription has lapsed or has been removed.
Use the following figures to help you troubleshoot when users experience these common problems:
-
Figure 9 (see the section above) illustrates a device in a healthy state, where Windows 10 Pro is activated and the Windows 10 Enterprise subscription is active.
-
Figure 10 (below) illustrates a device on which Windows 10 Pro is not activated, but the Windows 10 Enterprise subscription is active.
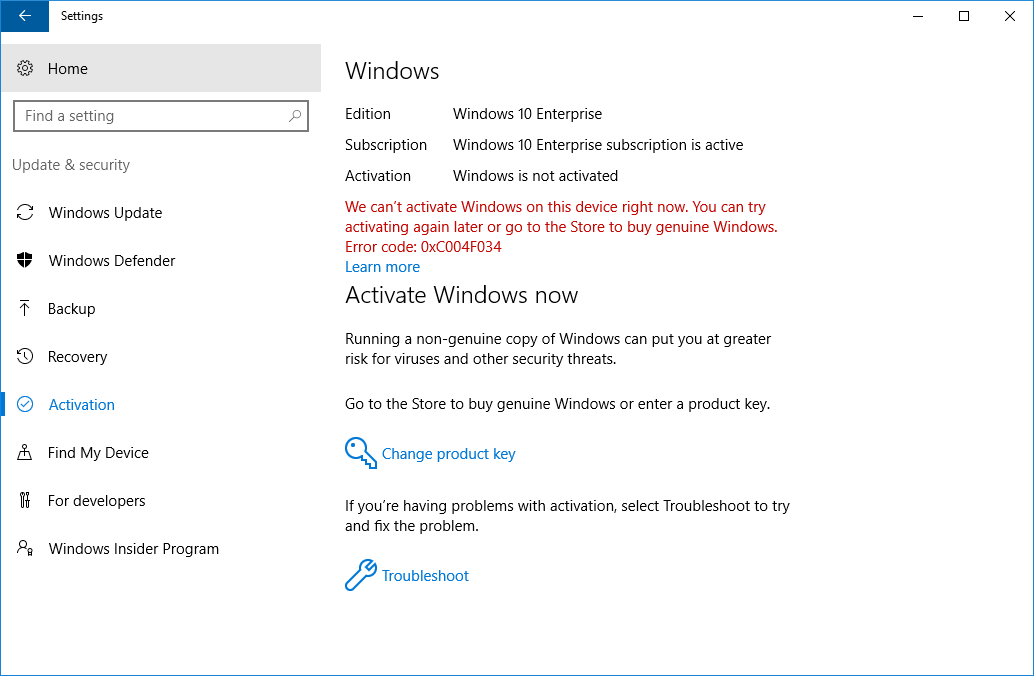
Figure 10 - Windows 10 Pro, version 1703 edition not activated in Settings -
Figure 11 (below) illustrates a device on which Windows 10 Pro is activated, but the Windows 10 Enterprise subscription is lapsed or removed.

Figure 11 - Windows 10 Enterprise subscription lapsed or removed in Settings -
Figure 12 (below) illustrates a device on which Windows 10 Pro license is not activated and the Windows 10 Enterprise subscription is lapsed or removed.

Figure 12 - Windows 10 Pro, version 1703 edition not activated and Windows 10 Enterprise subscription lapsed or removed in Settings
Review requirements on devices
Devices must be running Windows 10 Pro, version 1703, and be Azure Active Directory joined, or hybrid domain joined with Azure AD Connect. Customers who are federated with Azure Active Directory are also eligible. You can use the following procedures to review whether a particular device meets requirements.
To determine if a device is Azure Active Directory joined:
- Open a command prompt and type dsregcmd /status.
- Review the output under Device State. If the AzureAdJoined status is YES, the device is Azure Active Directory joined.
To determine the version of Windows 10:
At a command prompt, type: winver
A popup window will display the Windows 10 version number and detailed OS build information.
If a device is running a previous version of Windows 10 Pro (for example, version 1511), it will not be upgraded to Windows 10 Enterprise when a user signs in, even if the user has been assigned a subscription in the CSP portal.
